Getting started
Connect-Kotlin is a thin library that provides support for using generated, type-safe, and idiomatic Kotlin APIs to communicate with the app's servers using Protobuf.
In this guide, we'll use Connect-Kotlin to create a chat app for ELIZA, a very simple natural language processor built in the 1960s to represent a psychotherapist. The ELIZA service is implemented using Connect-Go, is already up and running in production, and supports the gRPC, gRPC-Web, and Connect protocols - all of which can be used with Connect-Kotlin for this tutorial. The APIs we'll be using are defined in a Protobuf schema that we'll use to generate a Connect-Kotlin client.
Prerequisites
- Android Studio installed.
- The Buf CLI installed, and include it in the
$PATH. - Set up Virtual Device Configuration on Android Studio, or use a physical device.
Create a new Android project from Android Studio
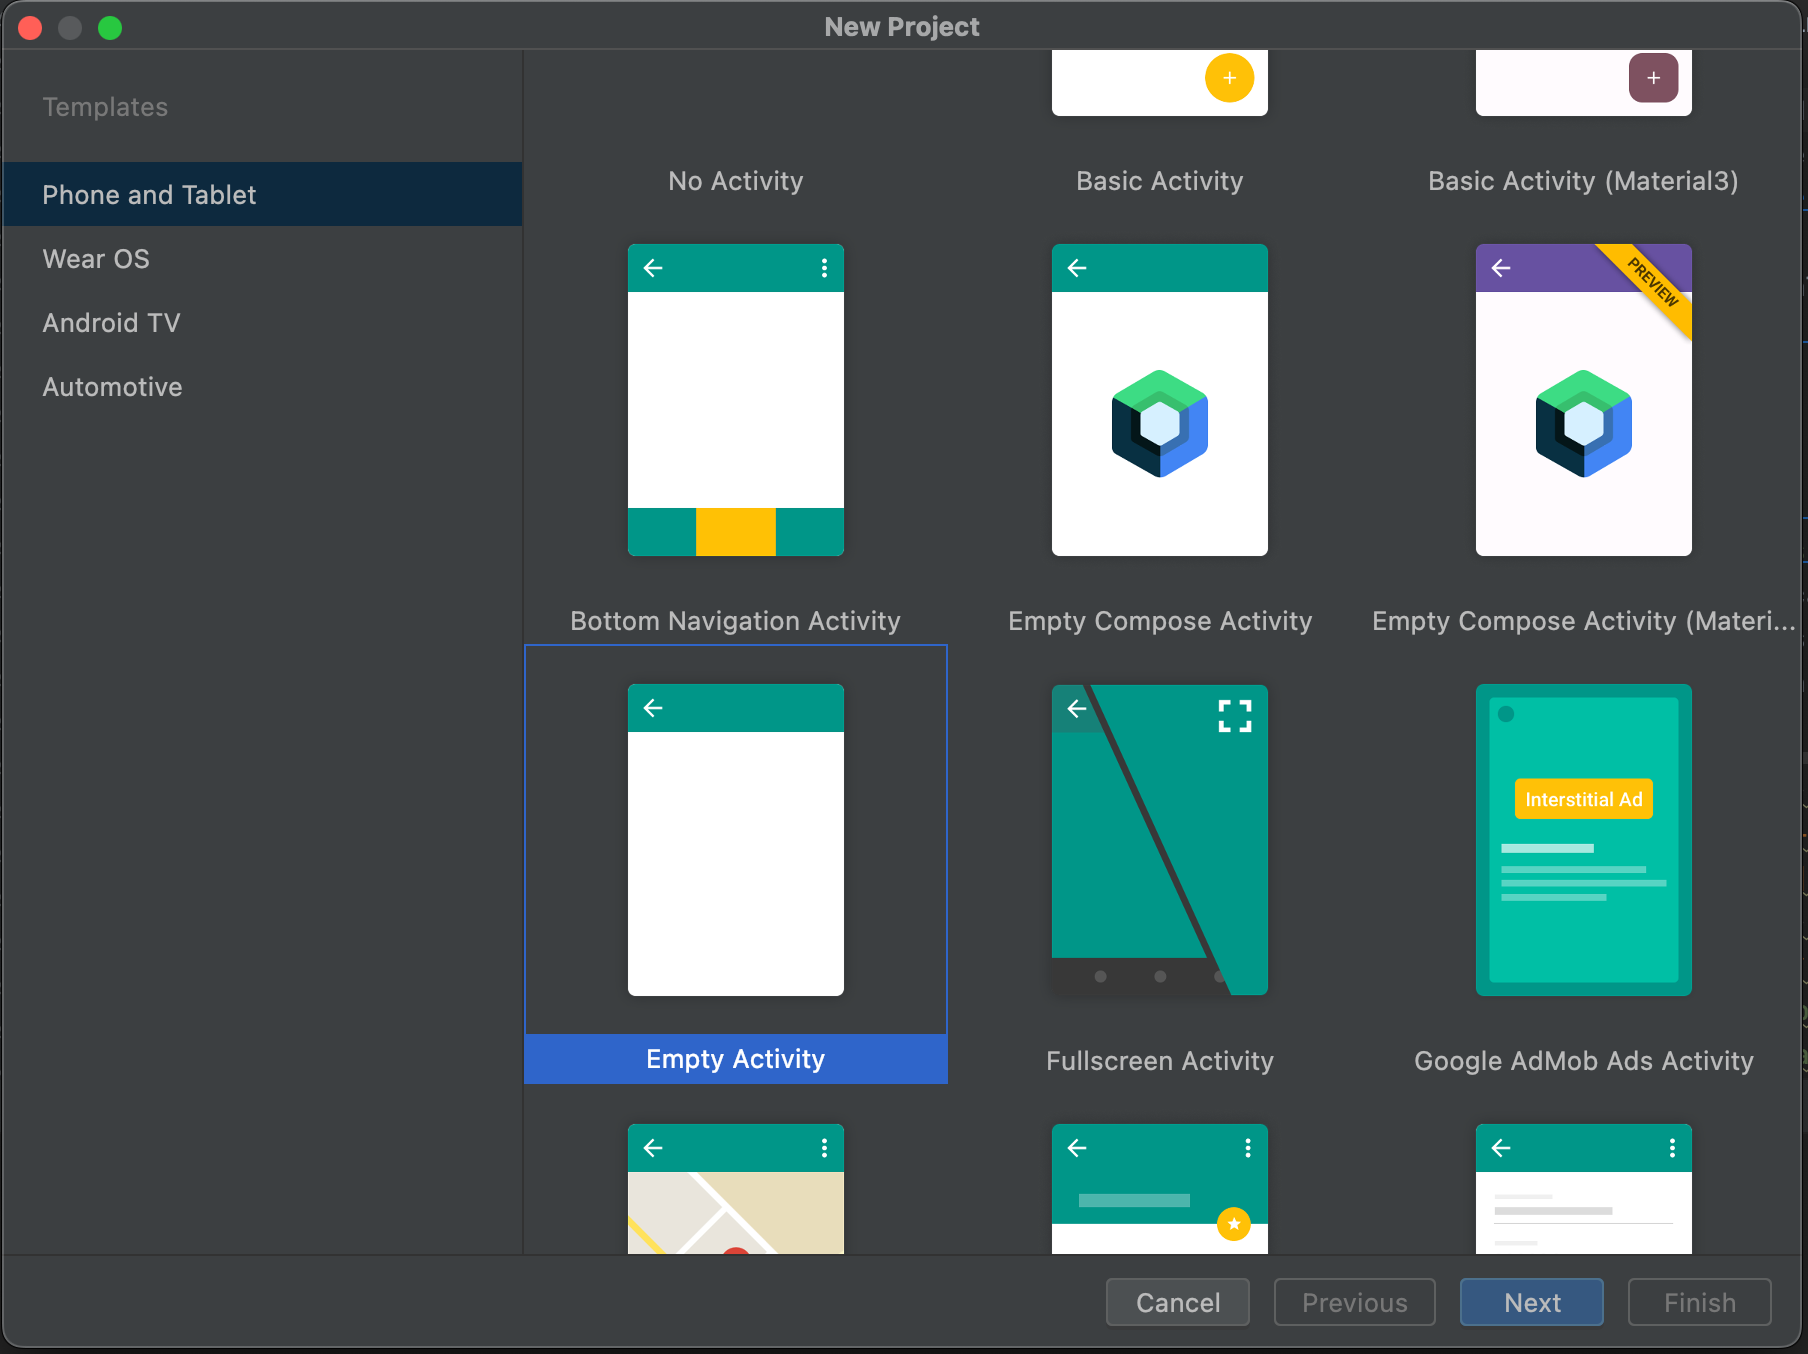
Once Android Studio is set up, go through the setup wizard and select an empty Activity to start building an application:
- Create a new project with Android Studio.
- Select an empty activity for the project and click "Next".
- For the project name, name it
Eliza. - Make sure the package is
com.example.eliza, and leave the rest as default.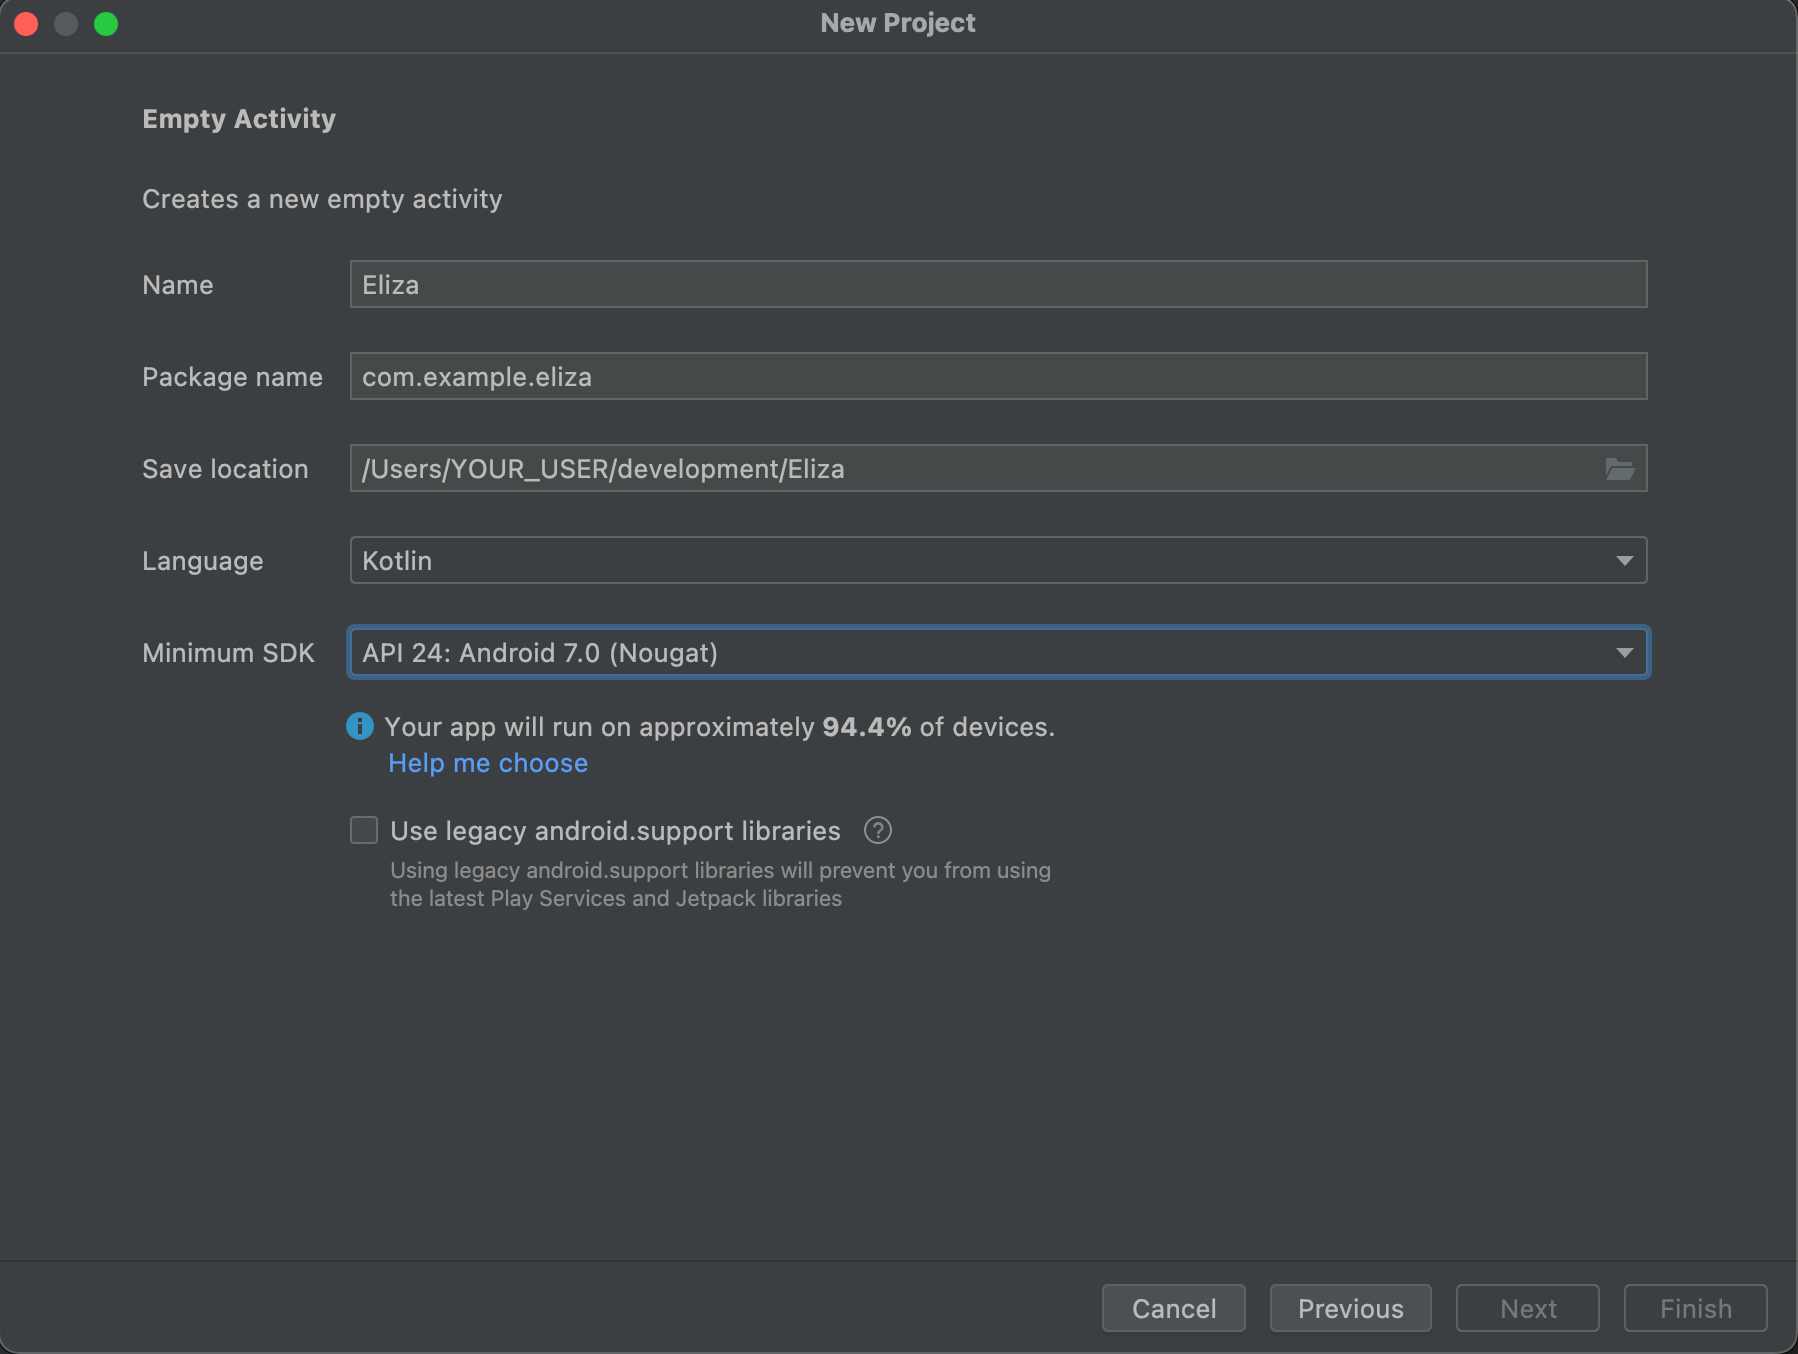
By default, Android Studio's project name is My Application and the package is com.example.myapplication. If that
is not overridden, the rest of the example will need to replace com.example.eliza with
com.example.myapplication within the code snippets.
Create an Android application with Gradle and Android Studio. Now we can start defining a new API for talking with Eliza!
Define a Protobuf service
In the shell, create a proto directory to keep the .proto files in.
$ mkdir proto
$ cd proto
Next, scaffold a basic buf.yaml by running buf mod init.
$ buf mod init
We have already defined the ElizaService and have
it hosted on the Buf Schema Registry to use in this example.
Export the Protobuf schema to use in our project.
$ buf export buf.build/connectrpc/eliza -o .
Our new proto directory should look like this:
proto
├── connectrpc
│   └── eliza
│       └── v1
│           └── eliza.proto
└── buf.yaml
Open the newly created eliza.proto file in the editor.
This file declares a connectrpc.eliza.v1 Protobuf package,
a service called ElizaService, and a single method
called Say. Under the hood, these components will be used to form the path
of the API's HTTP URL.
The file also contains two models, SayRequest and SayResponse, which
are the input and output for the Say RPC method.
Generate code
We're going to generate our code using buf, a modern replacement for
Google's protobuf compiler.
$ cd ..
$ touch buf.gen.yaml
We will use remote plugins, a feature of the Buf Schema Registry for generating code. Tell buf
how to generate code by putting this into buf.gen.yaml:
version: v1
plugins:
  - plugin: buf.build/protocolbuffers/java
    out: app/src/main/java
  - plugin: buf.build/connectrpc/kotlin
    out: app/src/main/java
The above buf.gen.yaml config does two things:
Executes the protocolbuffers/java plugin to generate Java specific code for the .proto files and places its output in the gen directory.
noteIf the javalite option is desired, simply add
opt: javaliteto the yaml block.Executes the connectrpc/kotlin plugin to generates clients for connect-kotlin. Compatible with the gRPC, gRPC-Web, and Connect RPC protocols into the specified directory. Connect is an RPC protocol which supports gRPC — including streaming! They interoperate seamlessly with Envoy, grpcurl, gRPC Gateway, and every other gRPC implementation. Connect servers handle gRPC-Web requests natively, without a translating proxy.
With those configuration files in place, generating Kotlin code can be easily done:
$ buf generate proto
In the app/src/main/java directory, there should now be some generated Java and Kotlin files:
app/src/main/java
├── connectrpc
│   └── eliza
│       └── v1
│           ├── Eliza.java
│           ├── ElizaServiceClient.kt
│           └── ElizaServiceClientInterface.kt
└── com
    └── example
        └── eliza
            └── MainActivity.kt
The ElizaServiceClientInterface.kt file contains the interface for the
ElizaServiceClient, and the ElizaServiceClient.kt file contains the implementation that conforms
to this interface.
The .java file is generated by Google's
Java plugin and contains the corresponding Java
models for the SayRequest and SayResponse we defined in our Protobuf file.
Update the application dependencies
Now, let's bootstrap the Android application. Declare the following additional dependencies in our
app's build.gradle.
build.gradle files in the project.Use the build.gradle located in ./app/build.gradle and not the one in the root directory.
- java
- javalite
dependencies {
  ...
  implementation 'androidx.recyclerview:recyclerview:1.2.1'
  implementation "androidx.lifecycle:lifecycle-runtime-ktx:2.5.1"
  implementation "com.squareup.okhttp3:okhttp:4.10.0"
  implementation "com.connectrpc:connect-kotlin-okhttp:0.1.11"
  // Java specific dependencies.
  implementation "com.connectrpc:connect-kotlin-google-java-ext:0.1.11"
  implementation "com.google.protobuf:protobuf-java:3.22.0"
}
dependencies {
  ...
  implementation 'androidx.recyclerview:recyclerview:1.2.1'
  implementation "androidx.lifecycle:lifecycle-runtime-ktx:2.5.1"
  implementation "com.squareup.okhttp3:okhttp:4.10.0"
  implementation "com.connectrpc:connect-kotlin-okhttp:0.1.11"
  // JavaLite specific dependencies.
  implementation "com.connectrpc:connect-kotlin-google-javalite-ext:0.1.11"
  implementation "com.google.protobuf:protobuf-javalite:3.22.0"
}
Once all the dependencies are declared, make sure Gradle is synced up.
The Protobuf dependency can be what the current project is already using. Make sure to have consistent versions between the runtime and the Google Java plugin version. Here we are using the latest version.
Having trouble with Gradle files? Here is what one might look like:
plugins {
  id 'com.android.application'
  id 'org.jetbrains.kotlin.android'
}

android {
  namespace 'com.example.eliza'
  compileSdk 33

  defaultConfig {
    applicationId "com.example.eliza"
    minSdk 24
    targetSdk 33
    versionCode 1
    versionName "1.0"

    testInstrumentationRunner "androidx.test.runner.AndroidJUnitRunner"
  }

  buildTypes {
    release {
      minifyEnabled false
      proguardFiles getDefaultProguardFile('proguard-android-optimize.txt'), 'proguard-rules.pro'
    }
  }
  compileOptions {
    sourceCompatibility JavaVersion.VERSION_1_8
    targetCompatibility JavaVersion.VERSION_1_8
  }
  kotlinOptions {
    jvmTarget = '1.8'
  }
}

dependencies {
  implementation 'androidx.core:core-ktx:1.7.0'
  implementation 'androidx.appcompat:appcompat:1.6.1'
  implementation 'com.google.android.material:material:1.8.0'
  implementation 'androidx.constraintlayout:constraintlayout:2.1.4'

  implementation "androidx.recyclerview:recyclerview:1.2.1"
  implementation "androidx.lifecycle:lifecycle-runtime-ktx:2.5.1"

  implementation "com.squareup.okhttp3:okhttp:4.10.0"
  implementation "com.connectrpc:connect-kotlin-okhttp:$version"

  implementation "com.connectrpc:connect-kotlin-google-java-ext:$version"
  implementation "com.google.protobuf:protobuf-java:3.22.0"
}
The default for my Android Studio isn't set up with Gradle kts. The examples here will is using
classic Gradle with Groovy. With Gradle kts, the changes are pretty similar for the dependency
declarations.
Set up and Android application
Set up resources and Android XML
First, set up the res directory files by creating and copying the following files to the
project:
Create a new file in the layout directory called item.xml for a chat view item.
$ touch app/src/main/res/layout/item.xml
The following layout XML is going to be used as the chat list item. It's the XML representation of what a single chat entry looks like.
<?xml version="1.0" encoding="utf-8"?>
<LinearLayout xmlns:android="http://schemas.android.com/apk/res/android"
              android:orientation="vertical"
              android:layout_width="match_parent"
              android:layout_height="wrap_content"
              android:padding="5dp"
>
  <TextView
    android:id="@+id/sender_name_text_view"
    android:layout_width="match_parent"
    android:layout_height="wrap_content"
    android:gravity="left"
    android:text="Eliza"
    android:textColor="#161EDE"
    android:visibility="gone"
  />
  <TextView
    android:id="@+id/message_text_view"
    android:layout_width="wrap_content"
    android:layout_height="wrap_content"
    android:textColor="@android:color/black"
  />
</LinearLayout>
Next, we'll need to set up our main view's XML. This will be the view displayed on app launch.
<?xml version="1.0" encoding="utf-8"?>
<androidx.constraintlayout.widget.ConstraintLayout
  xmlns:android="http://schemas.android.com/apk/res/android"
  xmlns:app="http://schemas.android.com/apk/res-auto"
  xmlns:tools="http://schemas.android.com/tools"
  android:layout_width="match_parent"
  android:layout_height="match_parent"
  android:padding="5dp"
  tools:context=".MainActivity"
>
  <TextView
    android:id="@+id/title_text_view"
    android:layout_width="match_parent"
    app:layout_constraintTop_toTopOf="parent"
    android:gravity="center"
    android:layout_height="40dp"
  />
  <androidx.recyclerview.widget.RecyclerView
    android:id="@+id/recycler_view"
    android:layout_width="match_parent"
    android:layout_height="match_parent"
    app:layoutManager="LinearLayoutManager"
    app:layout_constraintTop_toBottomOf="@+id/title_text_view"
    app:layout_constraintBottom_toTopOf="@+id/edit_text_view"
  />
  <EditText
    android:id="@+id/edit_text_view"
    android:layout_height="wrap_content"
    android:layout_width="match_parent"
    app:layout_constraintBottom_toBottomOf="parent"
    android:inputType="text"/>
  <Button
    android:id="@+id/send_button"
    android:layout_width="50dp"
    android:layout_height="50dp"
    app:layout_constraintBottom_toBottomOf="parent"
    app:layout_constraintRight_toRightOf="parent"
  />
</androidx.constraintlayout.widget.ConstraintLayout>
Android Studio likes to show the rendered UI by default when an XML file is opened.
To view the raw code, click the button Code in the top right corner.
Lastly, make sure the AndroidManifest.xml declares the right permissions to make a network request.
Configure the application with network permissions by adding the following to AndroidManifest.xml
<?xml version="1.0" encoding="utf-8"?>
<manifest xmlns:android="http://schemas.android.com/apk/res/android"
          package="com.example.eliza">

  <uses-permission android:name="android.permission.INTERNET"/>
  <uses-permission android:name="android.permission.ACCESS_NETWORK_STATE"/>

  <application
    android:allowBackup="true"
    android:label="Eliza Connect App"
    android:theme="@style/Theme.AppCompat.Light"
  >
    <activity
      android:name=".MainActivity"
      android:exported="true">
      <intent-filter>
        <action android:name="android.intent.action.MAIN"/>
        <category android:name="android.intent.category.LAUNCHER"/>
      </intent-filter>
      <meta-data
        android:name="android.app.lib_name"
        android:value=""/>
    </activity>
  </application>
</manifest>
That is it for our resource files for our application!
Android Kotlin view scaffolding
Before we start on making a network request, we'll need to set up some plumbing.
In order to display a dynamic list of chat messages, we'll need to construct a
RecyclerView along with some of it's scaffolding and boilerplate.
Create a RecyclerView.ViewHolder and RecyclerView.Adapter in a file called ChatRecycler.kt.
We'll be defining the MessageData data class to help manage the external usage in the next section.
$ touch app/src/main/java/com/example/eliza/ChatRecycler.kt
and add the following:
package com.example.eliza

import android.view.Gravity
import android.view.LayoutInflater
import android.view.View
import android.view.ViewGroup
import android.widget.LinearLayout
import android.widget.TextView
import androidx.recyclerview.widget.RecyclerView


class Adapter : RecyclerView.Adapter<ViewHolder>() {

  private val messages = mutableListOf<MessageData>()

  fun add(message: MessageData) {
    messages.add(message)
    notifyItemInserted(messages.size - 1)
  }

  override fun onCreateViewHolder(viewGroup: ViewGroup, viewType: Int): ViewHolder {
    val view = LayoutInflater.from(viewGroup.context)
      .inflate(R.layout.item, viewGroup, false)
    return ViewHolder(view)
  }

  override fun onBindViewHolder(viewHolder: ViewHolder, position: Int) {
    val messageViewModel = messages[position]
    viewHolder.textView.setText(messageViewModel.message)
    val layoutParams = viewHolder.textView.layoutParams as LinearLayout.LayoutParams
    layoutParams.gravity = if (messageViewModel.isEliza) Gravity.LEFT else Gravity.RIGHT
    viewHolder.textView.layoutParams = layoutParams

    if (messageViewModel.isEliza) {
      viewHolder.senderNameTextView.visibility = View.VISIBLE
    }
  }

  override fun getItemCount(): Int {
    return messages.size
  }
}

class ViewHolder(view: View) : RecyclerView.ViewHolder(view) {
  val senderNameTextView: TextView
  val textView: TextView

  init {
    textView = view.findViewById(R.id.message_text_view)
    senderNameTextView = view.findViewById(R.id.sender_name_text_view)
  }
}

data class MessageData(
  val message: String,
  val isEliza: Boolean
)
Talk with Eliza on Android
Now we are ready to dive into actual Kotlin code to speak with Eliza!
The ProtocolClient constructor requires a ProtocolClientConfig to be instantiated.
The required parameters are the host, serialization strategy, and protocol:
host: The host of the request (e.ghttps://demo.connectrpc.com).serializationStrategy: Configures theProtocolClientto use a specified base data type and encoding (e.g., Google's Java and Google's JavaLite).protocol: The underlying network protocol to use (e.g., Connect, gRPC, or gRPC-Web).
To use alternative serialization strategies or protocols, the ProtocolClientConfig can be instantiated with different
parameters:
val client = ProtocolClient(
  httpClient = ConnectOkHttpClient(OkHttpClient()),
  ProtocolClientConfig(
    host = host,
    serializationStrategy = GoogleJavaProtobufStrategy(),
    protocol = Protocol.CONNECT,
  ),
)
Use the generated Eliza client code
With the ProtocolClient, we will be able to create an instance of ElizaServiceClient to talk with
the Eliza service.
By using the lifecycleScope, the underlying network request will be tied to the coroutine context provided.
To make the network request, we can call a simple method from the generated code:
ElizaServiceClient.say(request: SayRequest). With that result, we will be able to appropriately handle the
success and failure cases of the network request.
Open up the MainActivity.kt file and replace its contents with the following:
package com.example.eliza

import android.os.Bundle
import android.util.Log
import android.widget.Button
import android.widget.EditText
import android.widget.TextView
import androidx.appcompat.app.AppCompatActivity
import androidx.lifecycle.lifecycleScope
import androidx.recyclerview.widget.RecyclerView
import com.connectrpc.ProtocolClientConfig
import com.connectrpc.extensions.GoogleJavaProtobufStrategy
import com.connectrpc.impl.ProtocolClient
import com.connectrpc.okhttp.ConnectOkHttpClient
import com.connectrpc.protocols.NetworkProtocol
import connectrpc.eliza.v1.Eliza
import connectrpc.eliza.v1.ElizaServiceClient
import kotlinx.coroutines.Dispatchers
import kotlinx.coroutines.launch
import kotlinx.coroutines.withContext

class MainActivity : AppCompatActivity() {

  private val adapter: Adapter = Adapter()
  private lateinit var titleTextView: TextView
  private lateinit var editTextView: EditText
  private lateinit var buttonView: Button
  private lateinit var elizaServiceClient: ElizaServiceClient

  override fun onCreate(savedInstanceState: Bundle?) {
    super.onCreate(savedInstanceState)
    setContentView(R.layout.activity_main)
    editTextView = findViewById(R.id.edit_text_view)
    titleTextView = findViewById(R.id.title_text_view)
    buttonView = findViewById(R.id.send_button)
    // Default question to ask as a pre-fill.
    editTextView.setText("I feel good.")
    val recyclerView = findViewById<RecyclerView>(R.id.recycler_view)
    recyclerView.adapter = adapter

    // Create a ProtocolClient.
    val client = ProtocolClient(
      httpClient = ConnectOkHttpClient(),
      ProtocolClientConfig(
        host = "https://demo.connectrpc.com",
        serializationStrategy = GoogleJavaProtobufStrategy(), // Or GoogleJavaJSONStrategy for JSON.
        networkProtocol = NetworkProtocol.CONNECT,
      ),
    )
    // Create the Eliza service client.
    elizaServiceClient = ElizaServiceClient(client)

    // Set up click listener to make a request to Eliza.
    buttonView.setOnClickListener {
      val sentence = editTextView.text.toString()
      adapter.add(MessageData(sentence, false))
      editTextView.setText("")

      lifecycleScope.launch {
        // Ensure IO context for unary requests.
        val elizaSentence = withContext(Dispatchers.IO) {
          talkToEliza(sentence)
        }
        // Display the result
        displayElizaResponse(elizaSentence)
      }
    }
  }

  private suspend fun talkToEliza(sentence: String): String? {
    // Make unary request to Eliza.
    val response = elizaServiceClient.say(Eliza.SayRequest.newBuilder().setSentence(sentence).build())
    val elizaSentence = response.success { success ->
      // Get Eliza's reply from the response.
      success.message.sentence
    }
    response.failure { failure ->
      Log.e("MainActivity", "Failed to talk to eliza", failure.cause)
    }
    return elizaSentence
  }

  private fun displayElizaResponse(sentence: String?) {
    if (!sentence.isNullOrBlank()) {
      adapter.add(MessageData(sentence, true))
    } else {
      adapter.add(MessageData("...No response from Eliza...", true))
    }
  }
}
Serialization Strategies
When configuring the ProtocolClient in the MainActivity.kt, it is also possible to configure what type
of Google generated base data type to use via the ProtocolClientConfig.serializationStrategy.
In the example, we use GoogleJavaProtobufStrategy which is the Google generated Java data types with the
Protobuf serialization.
To use JSON with the Google generated Java data types, the GoogleJavaJSONStrategy can be used.
Additionally, the GoogleJavaLiteProtobufStrategy is for when there are binary size requirements where
the underlying data types are the Google generated data types with the javalite option.
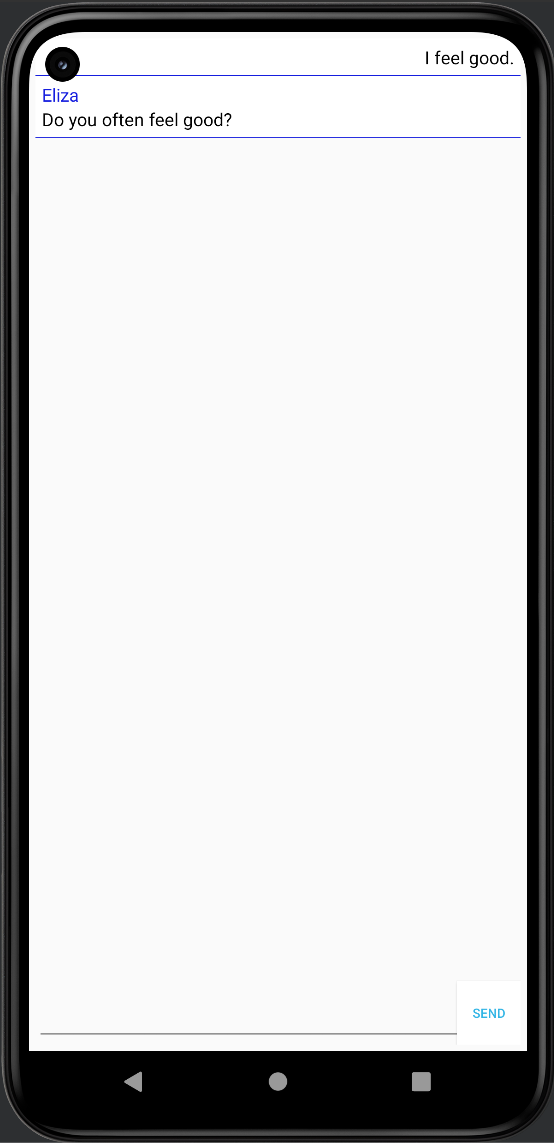
Run the app
Now the app can be built and run via the play button on Android Studio. This will allow us to chat with Eliza!
Using the gRPC or gRPC-Web protocol
Connect-Kotlin supports the Connect protocol, the gRPC protocol, and the gRPC-Web protocol. Instructions for switching between the three can be found here.
We recommend using Connect-Kotlin over gRPC-java even when using the gRPC-Web protocol for a few reasons:
- Idiomatic, typed APIs. No more hand-writing REST/JSON endpoints and data types. Connect-Kotlin generates idiomatic APIs that utilize Kotlin's language features and ergonomic improvements.
- Easy-to-use tooling. Connect-Kotlin integrates with the Buf CLI, enabling running all necessary Protobuf plugins without having to install or configure them as local dependencies.
- Flexibility. Connect-Kotlin uses
Okhttp. The library provides the option to swap this out.
More examples
There are more detailed examples within the Connect-Kotlin repository on GitHub. These examples demonstrate:
- Using streaming APIs.
- Integrating with Google's Java and JavaLite Protobuf.
- Using the Connect protocol.
- Using the gRPC protocol.
- Using the gRPC-Web protocol.